> ## Documentation Index
> Fetch the complete documentation index at: https://dripart-train-lora-docs.mintlify.site/llms.txt
> Use this file to discover all available pages before exploring further.
# ComfyUI(portable) Windows
> This tutorial will guide you on how to download and start using ComfyUI Portable and run the corresponding programs
**ComfyUI Portable** is a standalone packaged complete ComfyUI Windows version that has integrated an independent **Python (python\_embeded)** required for ComfyUI to run. You only need to extract it to use it. Currently, the portable version supports running through **Nvidia GPU** or **CPU**.
This guide section will walk you through installing ComfyUI Portable.
## Download ComfyUI Portable
You can get the latest ComfyUI Portable download link by clicking the link below
Download ComfyUI Portable
After downloading, you can use decompression software like [7-ZIP](https://7-zip.org/) to extract the compressed package
The file structure and description after extracting the portable version are as follows:
```
ComfyUI_windows_portable
├── 📂ComfyUI // ComfyUI main program
├── 📂python_embeded // Independent Python environment
├── 📂update // Batch scripts for upgrading portable version
├── README_VERY_IMPORTANT.txt // ComfyUI Portable usage instructions in English
├── run_cpu.bat // Double click to start ComfyUI (CPU only)
└── run_nvidia_gpu.bat // Double click to start ComfyUI (Nvidia GPU)
```
## How to Launch ComfyUI
Double click either `run_nvidia_gpu.bat` or `run_cpu.bat` depending on your computer's configuration to launch ComfyUI.
You will see the command running as shown in the image below
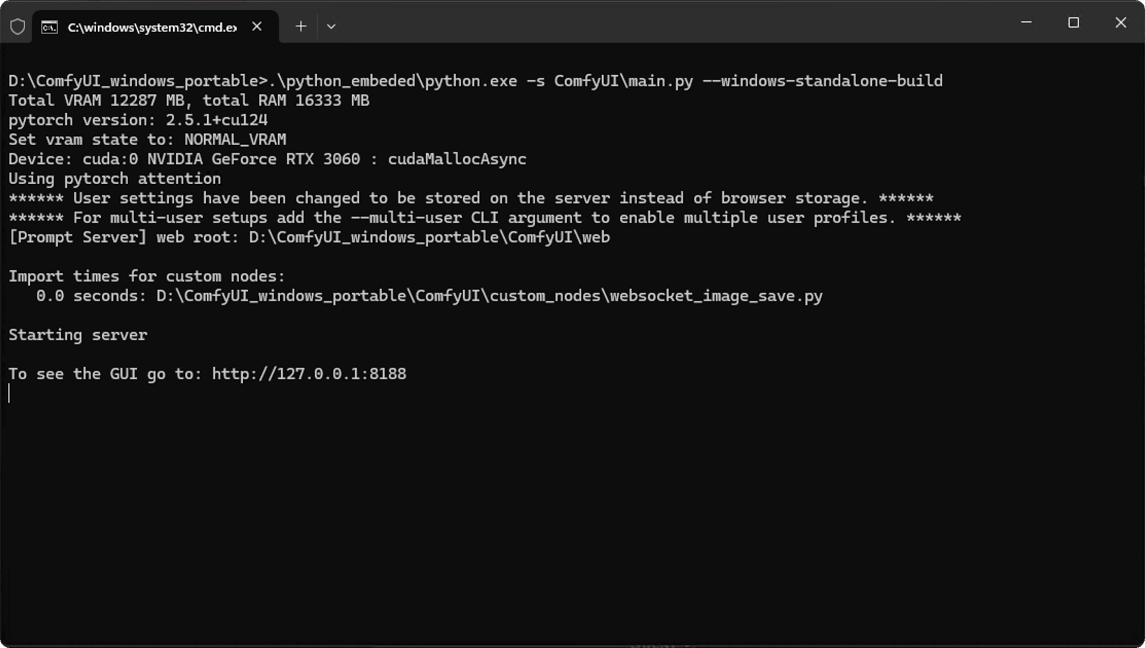
When you see something similar to the image
```
To see the GUI go to: http://127.0.0.1:8188
```
At this point, your ComfyUI service has started. Normally, ComfyUI will automatically open your default browser and navigate to `http://127.0.0.1:8188`. If it doesn't open automatically, please manually open your browser and visit this address.
During use, please do not close the corresponding command line window, otherwise ComfyUI will stop running
## First Image Generation
After successful installation, you can refer to the section below to start your ComfyUI journey\~
This tutorial will guide you through your first model installation and text-to-image generation
## Additional ComfyUI Portable Instructions
### 1. Upgrading ComfyUI Portable
You can use the batch commands in the update folder to upgrade your ComfyUI Portable version
```
ComfyUI_windows_portable
└─ 📂update
├── update.py
├── update_comfyui.bat // Update ComfyUI to the latest commit version
├── update_comfyui_and_python_dependencies.bat // Only use when you have issues with your runtime environment
└── update_comfyui_stable.bat // Update ComfyUI to the latest stable version
```
### 2. ComfyUI Model Sharing and Custom Model Directory Configuration
If you are also using [A1111](https://github.com/AUTOMATIC1111/stable-diffusion-webui) or want to customize your model storage location, you can modify the following file to complete the configuration
```
ComfyUI_windows_portable
└─ 📂ComfyUI
└── extra_model_paths.yaml.example // This file is the configuration template
```
Please copy and rename the `extra_model_paths.yaml.example` to `extra_model_paths.yaml`.
Below is the original configuration file content, which you can modify according to your needs
```yaml
#Rename this to extra_model_paths.yaml and ComfyUI will load it
#config for a1111 ui
#all you have to do is change the base_path to where yours is installed
a111:
base_path: path/to/stable-diffusion-webui/
checkpoints: models/Stable-diffusion
configs: models/Stable-diffusion
vae: models/VAE
loras: |
models/Lora
models/LyCORIS
upscale_models: |
models/ESRGAN
models/RealESRGAN
models/SwinIR
embeddings: embeddings
hypernetworks: models/hypernetworks
controlnet: models/ControlNet
#config for comfyui
#your base path should be either an existing comfy install or a central folder where you store all of your models, loras, etc.
#comfyui:
# base_path: path/to/comfyui/
# # You can use is_default to mark that these folders should be listed first, and used as the default dirs for eg downloads
# #is_default: true
# checkpoints: models/checkpoints/
# clip: models/clip/
# clip_vision: models/clip_vision/
# configs: models/configs/
# controlnet: models/controlnet/
# diffusion_models: |
# models/diffusion_models
# models/unet
# embeddings: models/embeddings/
# loras: models/loras/
# upscale_models: models/upscale_models/
# vae: models/vae/
#other_ui:
# base_path: path/to/ui
# checkpoints: models/checkpoints
# gligen: models/gligen
# custom_nodes: path/custom_nodes
```
For example, if your WebUI is located at `D:\stable-diffusion-webui\`, you can modify the corresponding configuration to
```yaml
a111:
base_path: D:\stable-diffusion-webui\
checkpoints: models/Stable-diffusion
configs: models/Stable-diffusion
vae: models/VAE
loras: |
models/Lora
models/LyCORIS
upscale_models: |
models/ESRGAN
models/RealESRGAN
models/SwinIR
embeddings: embeddings
hypernetworks: models/hypernetworks
controlnet: models/ControlNet
```
This way, models under paths like `D:\stable-diffusion-webui\models\Stable-diffusion\` can be detected and used by ComfyUI. Similarly, you can add other custom model location configurations
### 3. Setting Up LAN Access for ComfyUI Portable
If your ComfyUI is running on a local network and you want other devices to access ComfyUI, you can modify the `run_nvidia_gpu.bat` or `run_cpu.bat` file using Notepad to complete the configuration. This is mainly done by adding `--listen` to specify the listening address.
Below is an example of the `run_nvidia_gpu.bat` file command with the `--listen` parameter added
```bat
.\python_embeded\python.exe -s ComfyUI\main.py --listen --windows-standalone-build
pause
```
After enabling ComfyUI, you will notice the final running address will become
```
Starting server
To see the GUI go to: http://0.0.0.0:8188
To see the GUI go to: http://[::]:8188
```
You can press `WIN + R` and type `cmd` to open the command prompt, then enter `ipconfig` to view your local IP address. Other devices can then access ComfyUI by entering `http://your-local-IP:8188` in their browser.