> ## Documentation Index
> Fetch the complete documentation index at: https://dripart-train-lora-docs.mintlify.site/llms.txt
> Use this file to discover all available pages before exploring further.
# 发布节点
## 设置注册表账户
按照以下步骤设置注册表账户并发布您的第一个节点。
### 观看教程
### 创建发布者
发布者是一个可以向注册表(registry)发布自定义节点的身份。每个自定义节点都需要在 pyproject.toml [文件]() 中包含发布者标识符。
访问 [Comfy Registry](https://registry.comfy.org),创建一个发布者账户。您的发布者 ID 是全球唯一的,并且之后不能更改,因为它用于您的自定义节点的 URL 中。
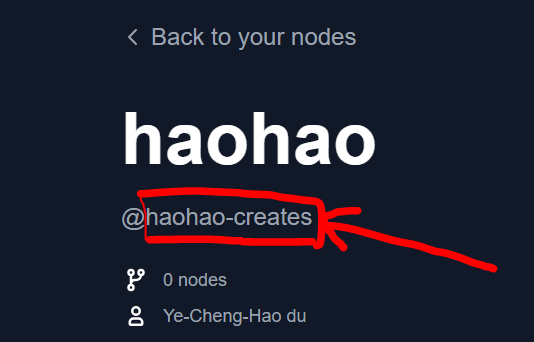
您的发布者 ID 可以在个人资料页面上 `@` 符号后面找到。
 ### 创建用于发布的 API 密钥
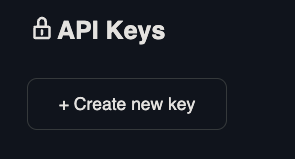
访问[这里](https://registry.comfy.org/nodes)并点击你想要为其创建 API 密钥的发布者。这将用于通过 CLI 发布自定义节点。
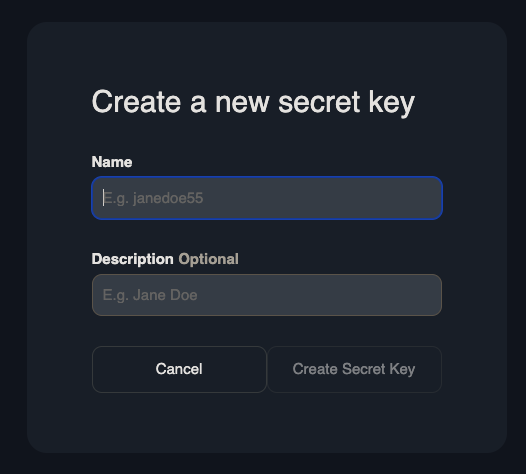
为 API 密钥命名并将其安全保存。如果密钥丢失了它,请重新创建一个新的密钥。
### 添加元数据
安装 comfy-cli了吗?
如果没有请 [先安装它](/zh-CN/comfy-cli/getting-started)。
```bash
comfy node init
```
这个命令将会生成下面这样的元数据:
```toml
# pyproject.toml
[project]
name = "" # Unique identifier for your node. Immutable after creation.
description = ""
version = "1.0.0" # Custom Node version. Must be semantically versioned.
license = { file = "LICENSE.txt" }
dependencies = [] # Filled in from requirements.txt
[project.urls]
Repository = "https://github.com/..."
[tool.comfy]
PublisherId = "" # TODO (fill in Publisher ID from Comfy Registry Website).
DisplayName = "" # Display name for the Custom Node. Can be changed later.
Icon = "https://example.com/icon.png" # SVG, PNG, JPG or GIF (MAX. 800x400px)
```
将此文件添加到您的仓库中。查看[规范](/zh-CN/registry/specifications)以获取有关 pyproject.toml 文件的更多信息。
## 发布到注册表(registry)
### 选项 1: Comfy CLI
运行下面的命令手动将您的节点发布到注册表。
```bash
comfy node publish
```
会被提示要求输入 API 密钥。
```bash
API Key for publisher '': ****************************************************
...Version 1.0.0 Published.
See it here: https://registry.comfy.org/publisherId/your-node
```
请记住,API 密钥默认是隐藏的。
当使用 CTRL+V 复制粘贴时,您的 API 密钥可能会有一个额外的 \x16 在后面,例如: \*\*\*\*\*\*\*\*\*\*\*\*\*\*\*\*\*\*\*\*\*\*\*\*\*\*\*\*\*\*\*\*\*\*\*\*\*\*\*\*\*\*\*\*\*\*\*\*\x16。
建议通过右键点击复制粘贴您的 API 密钥。
### 选项 2: Github Actions
通过 Github Actions 自动发布您的节点。
前往 Settings -> Secrets and Variables -> Actions -> Under Secrets Tab and Repository secrets -> New Repository Secret.
创建一个名为 `REGISTRY_ACCESS_TOKEN` 的 secret 并存储您的 API 密钥作为值。
复制下面的代码并粘贴到 `/.github/workflows/publish_action.yml`
```bash
name: Publish to Comfy registry
on:
workflow_dispatch:
push:
branches:
- main
paths:
- "pyproject.toml"
jobs:
publish-node:
name: Publish Custom Node to registry
runs-on: ubuntu-latest
steps:
- name: Check out code
uses: actions/checkout@v4
- name: Publish Custom Node
uses: Comfy-Org/publish-node-action@main
with:
personal_access_token: ${{ secrets.REGISTRY_ACCESS_TOKEN }} ## Add your own personal access token to your Github Repository secrets and reference it here.
```
如果您的分支名称不是 `main`,例如 `master`,请在 branches 部分添加名称。
推送到您的 `pyproject.toml` 的版本号。您应该在注册表中看到您的更新节点。
Github Action 会自动在您每次推送 `pyproject.toml` 文件的更新时运行。
### 创建用于发布的 API 密钥
访问[这里](https://registry.comfy.org/nodes)并点击你想要为其创建 API 密钥的发布者。这将用于通过 CLI 发布自定义节点。

为 API 密钥命名并将其安全保存。如果密钥丢失了它,请重新创建一个新的密钥。

### 添加元数据
安装 comfy-cli了吗?
如果没有请 [先安装它](/zh-CN/comfy-cli/getting-started)。
```bash
comfy node init
```
这个命令将会生成下面这样的元数据:
```toml
# pyproject.toml
[project]
name = "" # Unique identifier for your node. Immutable after creation.
description = ""
version = "1.0.0" # Custom Node version. Must be semantically versioned.
license = { file = "LICENSE.txt" }
dependencies = [] # Filled in from requirements.txt
[project.urls]
Repository = "https://github.com/..."
[tool.comfy]
PublisherId = "" # TODO (fill in Publisher ID from Comfy Registry Website).
DisplayName = "" # Display name for the Custom Node. Can be changed later.
Icon = "https://example.com/icon.png" # SVG, PNG, JPG or GIF (MAX. 800x400px)
```
将此文件添加到您的仓库中。查看[规范](/zh-CN/registry/specifications)以获取有关 pyproject.toml 文件的更多信息。
## 发布到注册表(registry)
### 选项 1: Comfy CLI
运行下面的命令手动将您的节点发布到注册表。
```bash
comfy node publish
```
会被提示要求输入 API 密钥。
```bash
API Key for publisher '': ****************************************************
...Version 1.0.0 Published.
See it here: https://registry.comfy.org/publisherId/your-node
```
请记住,API 密钥默认是隐藏的。
当使用 CTRL+V 复制粘贴时,您的 API 密钥可能会有一个额外的 \x16 在后面,例如: \*\*\*\*\*\*\*\*\*\*\*\*\*\*\*\*\*\*\*\*\*\*\*\*\*\*\*\*\*\*\*\*\*\*\*\*\*\*\*\*\*\*\*\*\*\*\*\*\x16。
建议通过右键点击复制粘贴您的 API 密钥。
### 选项 2: Github Actions
通过 Github Actions 自动发布您的节点。
前往 Settings -> Secrets and Variables -> Actions -> Under Secrets Tab and Repository secrets -> New Repository Secret.
创建一个名为 `REGISTRY_ACCESS_TOKEN` 的 secret 并存储您的 API 密钥作为值。
复制下面的代码并粘贴到 `/.github/workflows/publish_action.yml`
```bash
name: Publish to Comfy registry
on:
workflow_dispatch:
push:
branches:
- main
paths:
- "pyproject.toml"
jobs:
publish-node:
name: Publish Custom Node to registry
runs-on: ubuntu-latest
steps:
- name: Check out code
uses: actions/checkout@v4
- name: Publish Custom Node
uses: Comfy-Org/publish-node-action@main
with:
personal_access_token: ${{ secrets.REGISTRY_ACCESS_TOKEN }} ## Add your own personal access token to your Github Repository secrets and reference it here.
```
如果您的分支名称不是 `main`,例如 `master`,请在 branches 部分添加名称。
推送到您的 `pyproject.toml` 的版本号。您应该在注册表中看到您的更新节点。
Github Action 会自动在您每次推送 `pyproject.toml` 文件的更新时运行。