> ## Documentation Index
> Fetch the complete documentation index at: https://dripart-train-lora-docs.mintlify.site/llms.txt
> Use this file to discover all available pages before exploring further.
# 如何解决和排查 ComfyUI 中自定义节点导致的问题
> 故障排除和修复由自定义节点和扩展引起的问题
## 快速问题诊断
如果你遇到以下任何问题,很可能是由自定义节点引起的:
* ComfyUI 崩溃或无法启动
* 控制台/日志中出现"Failed to import"(导入失败)错误
* UI 完全损坏或显示空白屏幕
* "Prompt execution failed"(提示执行失败)错误
* 应该可用的节点丢失
## 这是自定义节点问题吗?
大多数 ComfyUI 问题都是由自定义节点(扩展)引起的。让我们检查是否是这种情况。
### 步骤 1:禁用所有自定义节点后测试
在禁用所有自定义节点的情况下运行 ComfyUI:
从设置菜单中启动禁用自定义节点的 ComfyUI 桌面版
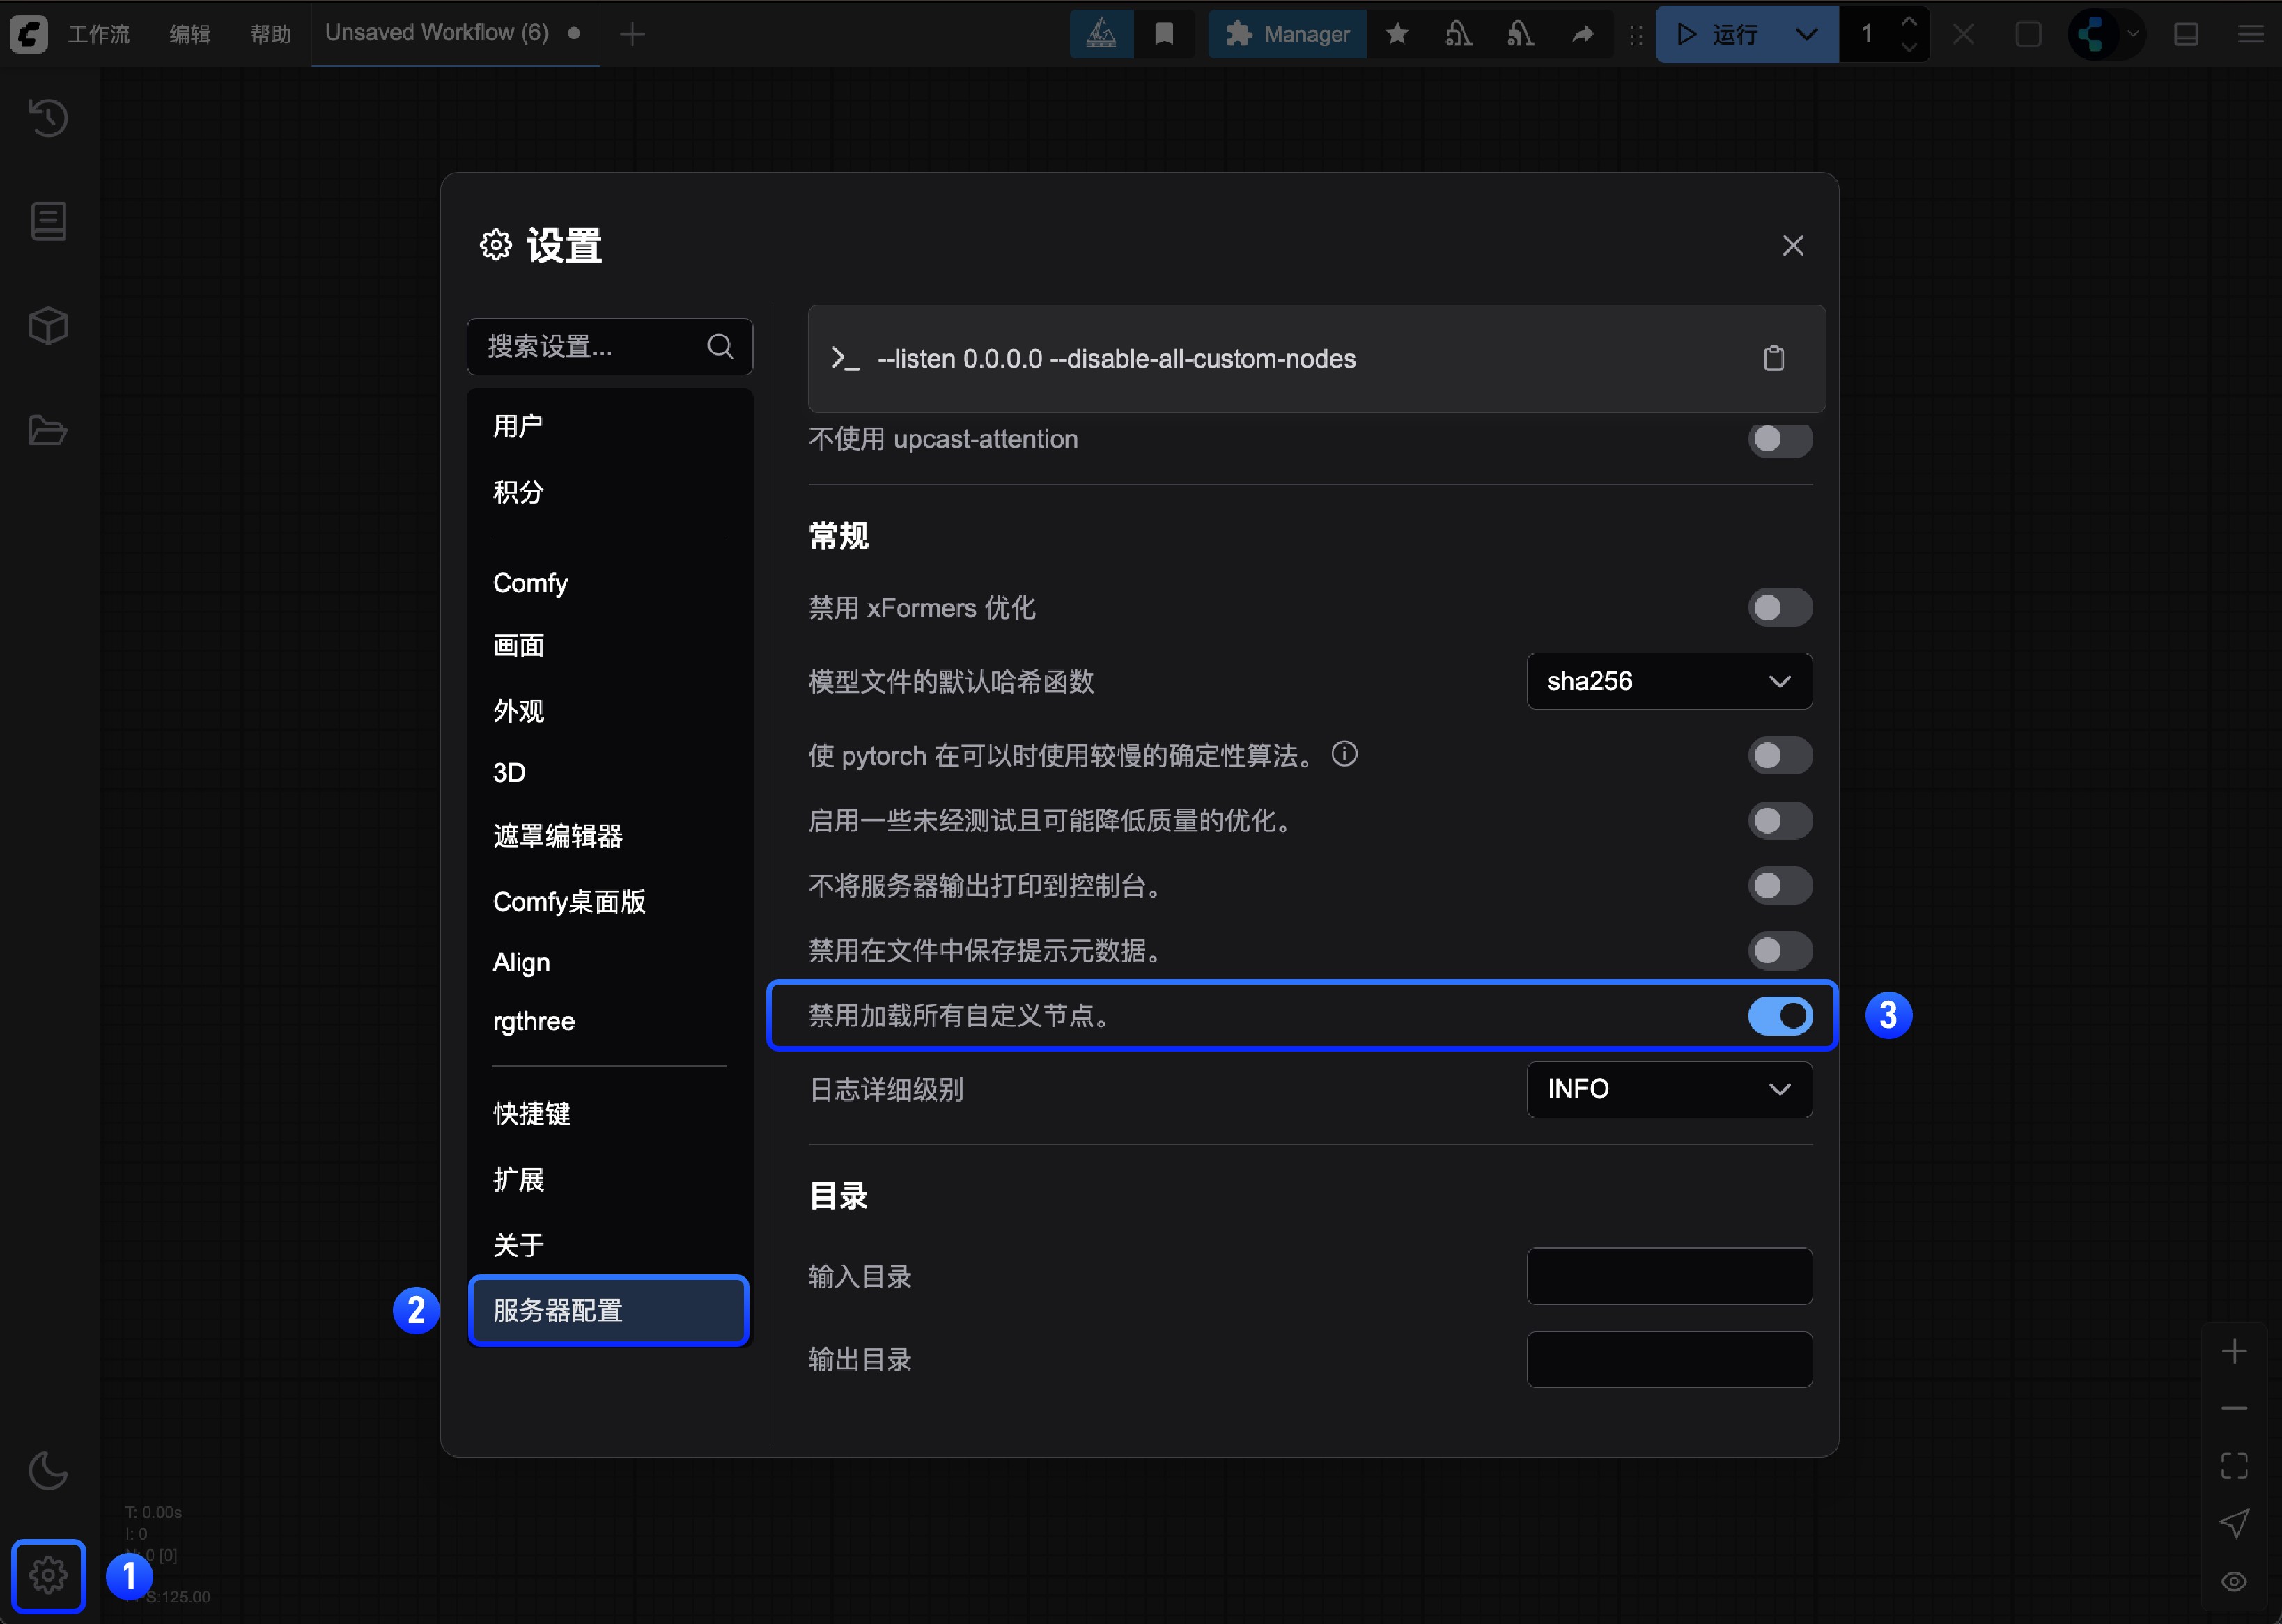
或手动运行服务器:
```bash
cd path/to/your/comfyui
python main.py --disable-all-custom-nodes
```
```bash
cd ComfyUI
python main.py --disable-all-custom-nodes
```
打开便携版所在的文件夹,找到 `run_nvidia_gpu.bat` 或者 `run_cpu.bat` 文件
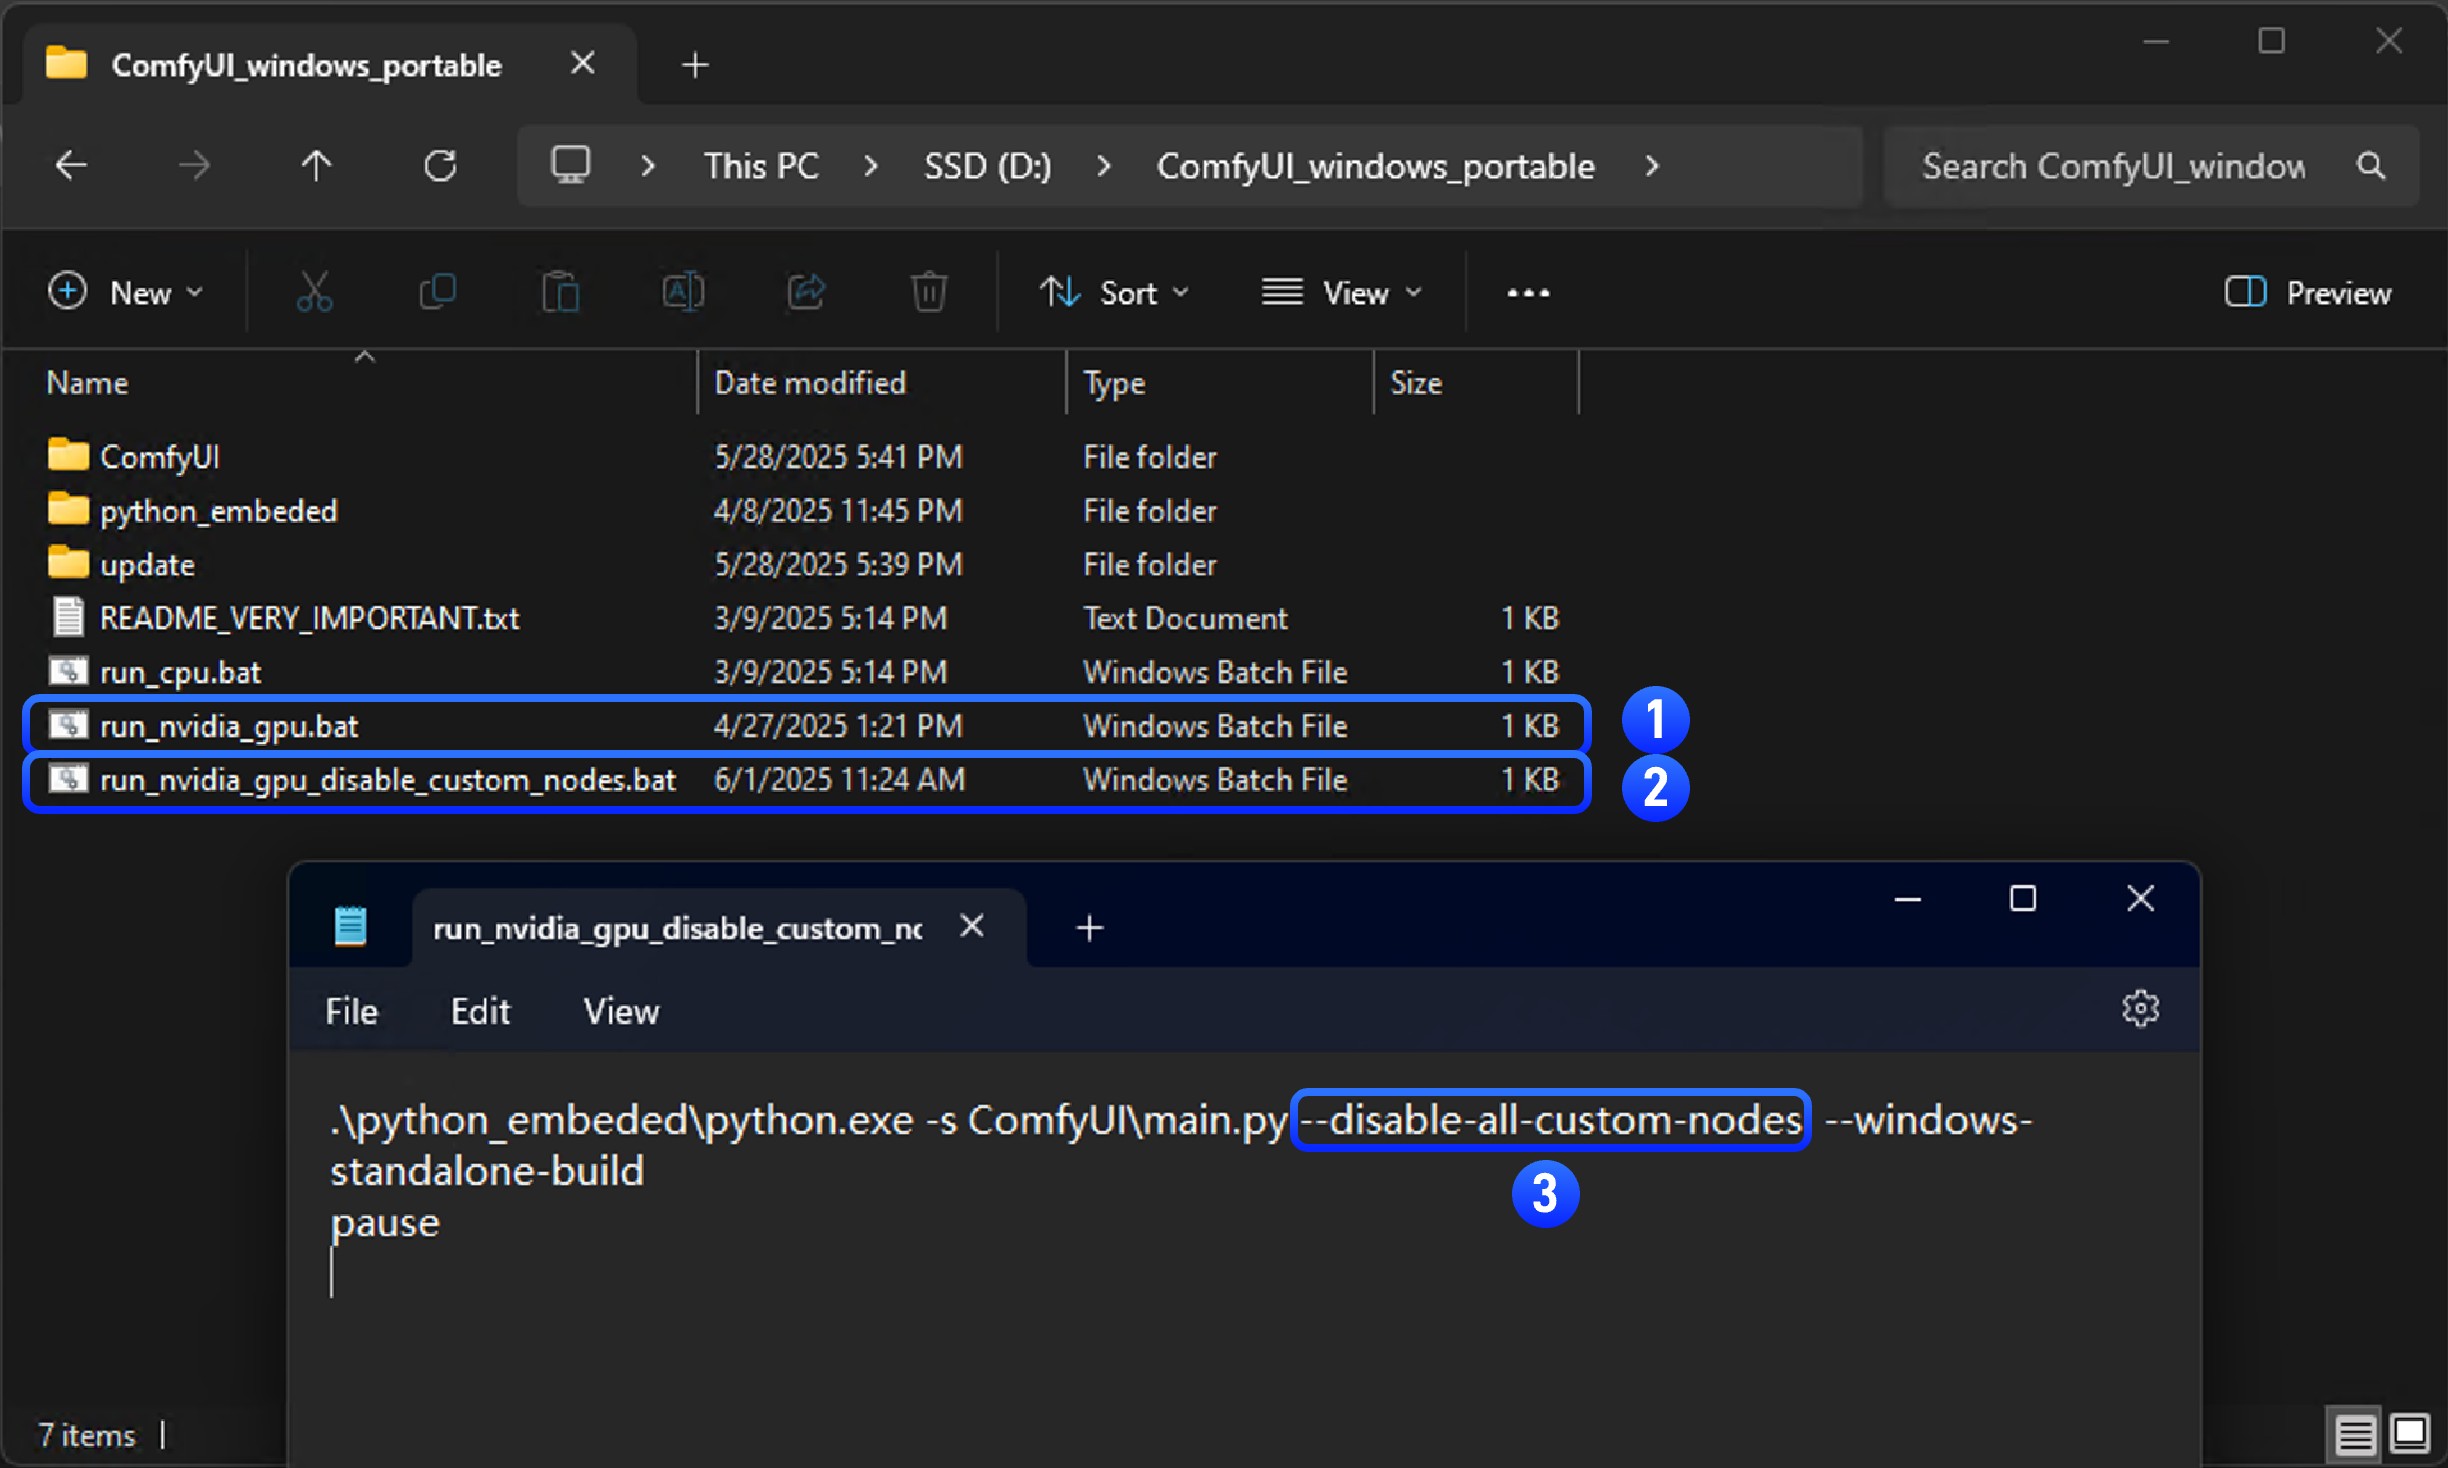
1. 复制 `run_nvidia_gpu.bat` 或者 `run_cpu.bat` 文件并重命名为 `run_nvidia_gpu_disable_custom_nodes.bat`
2. 使用记事本打开复制后的文件
3. 在文件中添加 `--disable-all-custom-nodes` 参数,或者复制下面的参数保存到 txt 文件中后将文件后缀名改为 `.bat`
```bash
.\python_embeded\python.exe -s ComfyUI\main.py --disable-all-custom-nodes --windows-standalone-build
pause
```
4. 保存文件并关闭
5. 双击运行文件,如果一切正常,你应该会看到 ComfyUI 启动,并且自定义节点被禁用
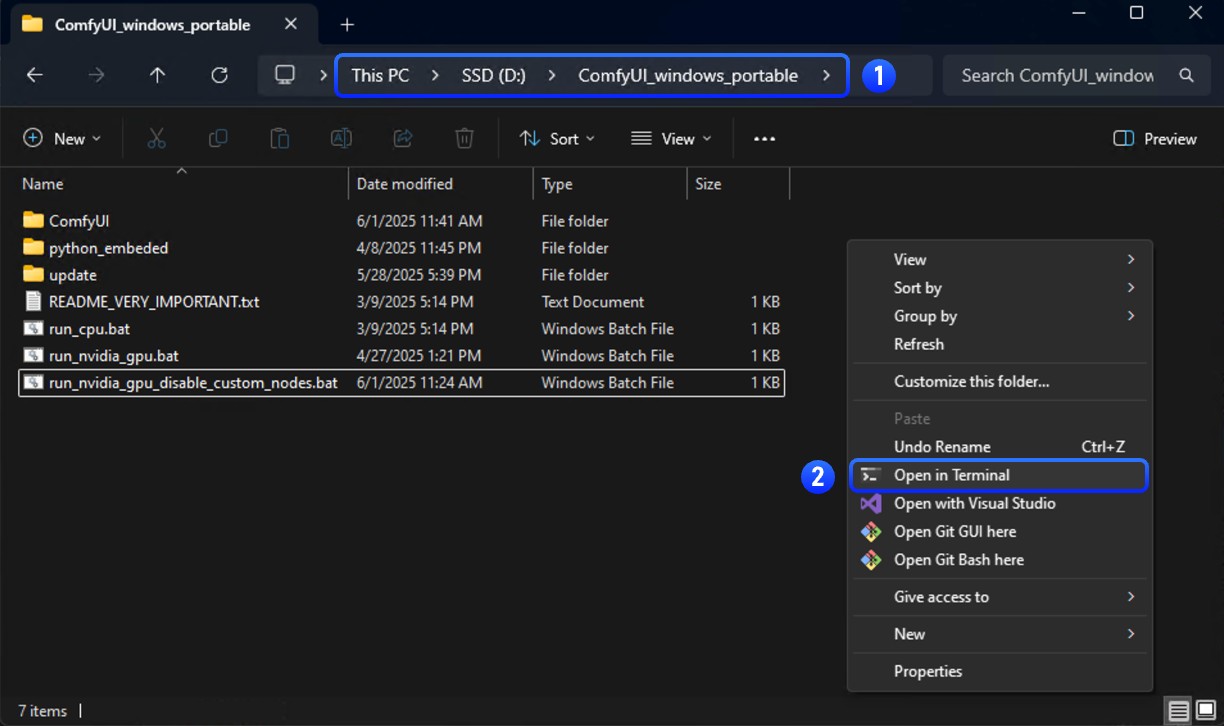
1. 进入便携版所在的文件夹
2. 通过右键菜单 → 打开终端 来打开命令行
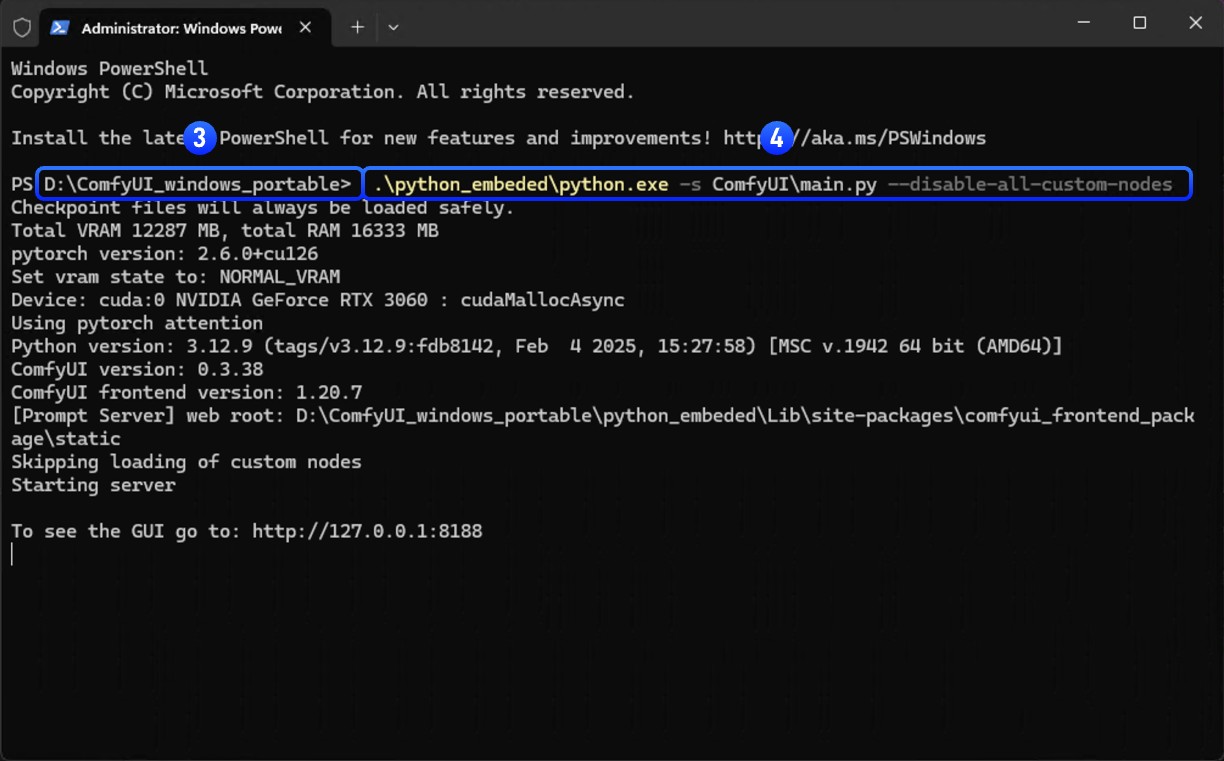
3. 确保在命令行中文件夹名称是当前便携版所在的文件目录
4. 输入以下命令,来通过便携版的 python 来启动 ComfyUI 并禁用自定义节点
```
.\python_embeded\python.exe -s ComfyUI\main.py --disable-all-custom-nodes
```
**结果:**
* ✅ **问题消失**:自定义节点导致问题 → 继续步骤 2
* ❌ **问题仍然存在**:不是自定义节点问题 → [报告问题](#报告问题)
## 步骤 2:找到有问题的自定义节点
我们将使用**二分搜索**快速找到哪个自定义节点导致问题。这比逐个测试节点要快得多。
### 选项 A:使用 Comfy CLI(推荐)
如果你已安装 [Comfy CLI](/zh-CN/comfy-cli/getting-started),可以使用自动化的二分工具来找到有问题的节点:
```bash
# 开始二分会话
comfy-cli node bisect start
# 按照提示操作:
# - 使用当前启用的节点集测试 ComfyUI
# - 如果问题消失,标记为 'good':comfy-cli node bisect good
# - 如果问题仍然存在,标记为 'bad':comfy-cli node bisect bad
# - 重复直到识别出有问题的节点
# 完成后重置
comfy-cli node bisect reset
```
二分工具将自动启用/禁用节点并引导你完成整个过程。
### 选项 B:手动二分搜索
如果你更喜欢手动操作或没有安装 Comfy CLI,请按照以下步骤操作:
### 二分搜索的工作原理
我们不是逐个测试每个节点(可能需要几个小时),而是反复将节点分成两半:
```
8 个节点 → 测试 4 个节点 → 测试 2 个节点 → 测试 1 个节点 ✓
8 个节点的示例:
1. 测试节点 1-4:问题仍然存在 ✓ → 问题在剩余节点 5-8 中
2. 测试节点 5-6:问题消失 ✓ → 问题在节点 7-8 中
3. 测试节点 7:问题仍然存在 ✓ → 节点 7 是问题所在!
这只需要 3 次测试,而不是测试所有 8 个节点。
```
### 二分搜索过程
开始之前,请**创建备份**你的 custom\_nodes 文件夹,以防出现问题。
#### 创建临时文件夹
```bash
# 创建备份和临时文件夹
mkdir "%USERPROFILE%\custom_nodes_backup"
mkdir "%USERPROFILE%\custom_nodes_temp"
# 首先备份所有内容
xcopy "custom_nodes\*" "%USERPROFILE%\custom_nodes_backup\" /E /H /Y
```
```bash
# 创建备份和临时文件夹
mkdir ~/custom_nodes_backup
mkdir ~/custom_nodes_temp
# 首先备份所有内容
cp -r custom_nodes/* ~/custom_nodes_backup/
```
```bash
# 创建备份和临时文件夹
mkdir /content/custom_nodes_backup
mkdir /content/custom_nodes_temp
# 首先备份所有内容
cp -r /content/ComfyUI/custom_nodes/* /content/custom_nodes_backup/
```
#### 找到有问题的节点
1. **列出你的自定义节点:**
```bash
dir custom_nodes
```
```bash
ls custom_nodes/
```
```bash
ls /content/ComfyUI/custom_nodes/
```
2. **将节点分成两半:**
假设你有 8 个自定义节点。将前一半移动到临时存储:
```bash
# 将前一半(节点 1-4)移动到临时文件夹
move "custom_nodes\node1" "%USERPROFILE%\custom_nodes_temp\"
move "custom_nodes\node2" "%USERPROFILE%\custom_nodes_temp\"
move "custom_nodes\node3" "%USERPROFILE%\custom_nodes_temp\"
move "custom_nodes\node4" "%USERPROFILE%\custom_nodes_temp\"
```
```bash
# 将前一半(节点 1-4)移动到临时文件夹
mv custom_nodes/node1 ~/custom_nodes_temp/
mv custom_nodes/node2 ~/custom_nodes_temp/
mv custom_nodes/node3 ~/custom_nodes_temp/
mv custom_nodes/node4 ~/custom_nodes_temp/
```
```bash
# 将前一半(节点 1-4)移动到临时文件夹
mv /content/ComfyUI/custom_nodes/node1 /content/custom_nodes_temp/
mv /content/ComfyUI/custom_nodes/node2 /content/custom_nodes_temp/
mv /content/ComfyUI/custom_nodes/node3 /content/custom_nodes_temp/
mv /content/ComfyUI/custom_nodes/node4 /content/custom_nodes_temp/
```
3. **测试 ComfyUI:**
```bash
python main.py
```
4. **解释结果:**
* **问题仍然存在**:问题在剩余节点(5-8)中
* **问题消失**:问题在移动的节点(1-4)中
5. **缩小范围:**
* 如果问题仍然存在:将剩余节点的一半(例如节点 7-8)移动到临时文件夹
* 如果问题消失:将临时节点的一半(例如节点 3-4)移回 custom\_nodes
6. **重复直到找到单个有问题的节点**
### 视觉示例
让我们通过一个包含 8 个自定义节点的完整示例:
```
📁 custom_nodes/
├── 🔧 ComfyUI-Manager
├── 🎨 ComfyUI-Custom-Scripts
├── 🖼️ ComfyUI-Impact-Pack
├── 🔄 ComfyUI-Workflow-Component
├── 📊 ComfyUI-AnimateDiff-Evolved
├── 🎭 ComfyUI-FaceRestore
├── ⚡ ComfyUI-Advanced-ControlNet
└── 🛠️ ComfyUI-Inspire-Pack
```
**第 1 轮:** 将前 4 个移动到临时文件夹
* 测试 → 问题仍然存在 ✓
* 问题在:ComfyUI-AnimateDiff-Evolved、ComfyUI-FaceRestore、ComfyUI-Advanced-ControlNet、ComfyUI-Inspire-Pack
**第 2 轮:** 将剩余 4 个中的 2 个移动到临时文件夹
* 测试 → 问题消失 ✓
* 问题在:ComfyUI-Advanced-ControlNet、ComfyUI-Inspire-Pack
**第 3 轮:** 将剩余 2 个中的 1 个移动到临时文件夹
* 测试 → 问题仍然存在 ✓
* **找到了!** ComfyUI-Inspire-Pack 是有问题的节点
## 步骤 3:修复问题
一旦你识别出有问题的自定义节点:
### 选项 1:更新节点
1. 检查 ComfyUI 管理器中是否有可用更新
2. 更新节点并再次测试
### 选项 2:替换节点
1. 寻找具有类似功能的替代自定义节点
2. 查看 [ComfyUI 注册表](https://registry.comfy.org) 寻找替代方案
### 选项 3:报告问题
联系自定义节点开发者:
1. 找到节点的 GitHub 仓库
2. 创建问题并包含:
* 你的 ComfyUI 版本
* 错误消息/日志
* 重现步骤
* 你的操作系统
### 选项 4:移除节点
如果没有修复可用且你不需要该功能:
1. 从 `custom_nodes/` 中移除有问题的节点
2. 重启 ComfyUI
## 报告问题
如果问题不是由自定义节点引起的,请参考通用[故障排除概述](/zh-CN/troubleshooting/overview)了解其他常见问题。
### 自定义节点特定问题
联系自定义节点开发者:
* 找到节点的 GitHub 仓库
* 创建问题并包含你的 ComfyUI 版本、错误消息、重现步骤和操作系统
* 查看节点文档了解已知问题
### ComfyUI 核心问题
* **GitHub**:[ComfyUI Issues](https://github.com/comfyanonymous/ComfyUI/issues)
* **论坛**:[官方 ComfyUI 论坛](https://forum.comfy.org/)
### 桌面应用问题
* **GitHub**:[ComfyUI 桌面问题](https://github.com/Comfy-Org/desktop/issues)
### 前端问题
* **GitHub**:[ComfyUI 前端问题](https://github.com/Comfy-Org/ComfyUI_frontend/issues)
对于一般安装、模型或性能问题,请参见我们的[故障排除概述](/zh-CN/troubleshooting/overview)和[模型问题](/zh-CN/troubleshooting/model-issues)页面。