> ## Documentation Index
> Fetch the complete documentation index at: https://dripart-train-lora-docs.mintlify.site/llms.txt
> Use this file to discover all available pages before exploring further.
# Cosmos Predict2 文生图 ComfyUI 官方示例
> 本文介绍了如何在 ComfyUI 中完成 Cosmos-Predict2 文生图的工作流
Cosmos-Predict2 是由 NVIDIA 推出的新一代物理世界基础模型,专为物理 AI 场景下的高质量视觉生成与预测任务设计。
该模型具备极高的物理准确性、环境交互性和细节还原能力,能够真实模拟复杂的物理现象与动态场景。
Cosmos-Predict2 支持文本到图像(Text2Image)和视频到世界(Video2World)等多种生成方式,广泛应用于工业仿真、自动驾驶、城市规划、科学研究等领域,是推动智能视觉与物理世界深度融合的重要基础工具。
GitHub:[Cosmos-predict2](https://github.com/nvidia-cosmos/cosmos-predict2)
huggingface: [Cosmos-Predict2](https://huggingface.co/collections/nvidia/cosmos-predict2-68028efc052239369a0f2959)
本篇指南将引导你完成在 ComfyUI 中 **文生图** 工作流程。
对于视频生成部分,请参考下面的部分
使用 Cosmos-Predict2 的进行视频生成
如果在加载下面的工作流文件时,你发现存在节点缺失,可能是因为以下情况:
1. 你使用的 ComfyUI 版本不是最新的开发(nightly)版本。
2. 你使用的 ComfyUI 版本是稳定(release)版本或桌面版(desktop)版本(不包含最新的功能更新)。
3. 你使用的 ComfyUI 版本是最新的 commit 版本,但在启动过程中部分节点导入失败了。
请先确保你已经成功更新 ComfyUI 到最新的开发(nightly)版本, 请查看:[如何更新 ComfyUI](zh-CN/installation/update_comfyui) 部分了解如何更新 ComfyUI。
## Cosmos Predict2 Video2World 工作流
### 1.下载工作流文件

### 2.手动模型安装
**Diffusion model**
* [cosmos\_predict2\_2B\_t2i.safetensors](https://huggingface.co/Comfy-Org/Cosmos_Predict2_repackaged/resolve/main/cosmos_predict2_2B_t2i.safetensors)
其它权重请访问 [Cosmos\_Predict2\_repackaged](https://huggingface.co/Comfy-Org/Cosmos_Predict2_repackaged) 进行下载
**Text encoder**
[oldt5\_xxl\_fp8\_e4m3fn\_scaled.safetensors](https://huggingface.co/comfyanonymous/cosmos_1.0_text_encoder_and_VAE_ComfyUI/resolve/main/text_encoders/oldt5_xxl_fp8_e4m3fn_scaled.safetensors)
**VAE**
[wan\_2.1\_vae.safetensors](https://huggingface.co/Comfy-Org/Wan_2.1_ComfyUI_repackaged/resolve/main/split_files/vae/wan_2.1_vae.safetensors)
文件保存位置
```
📂 ComfyUI/
├──📂 models/
│ ├── 📂 diffusion_models/
│ │ └─── cosmos_predict2_2B_t2i.safetensors
│ ├── 📂 text_encoders/
│ │ └─── oldt5_xxl_fp8_e4m3fn_scaled.safetensors
│ └── 📂 vae/
│ └── wan_2.1_vae.safetensors
```
### 3. 按步骤完成工作流运行
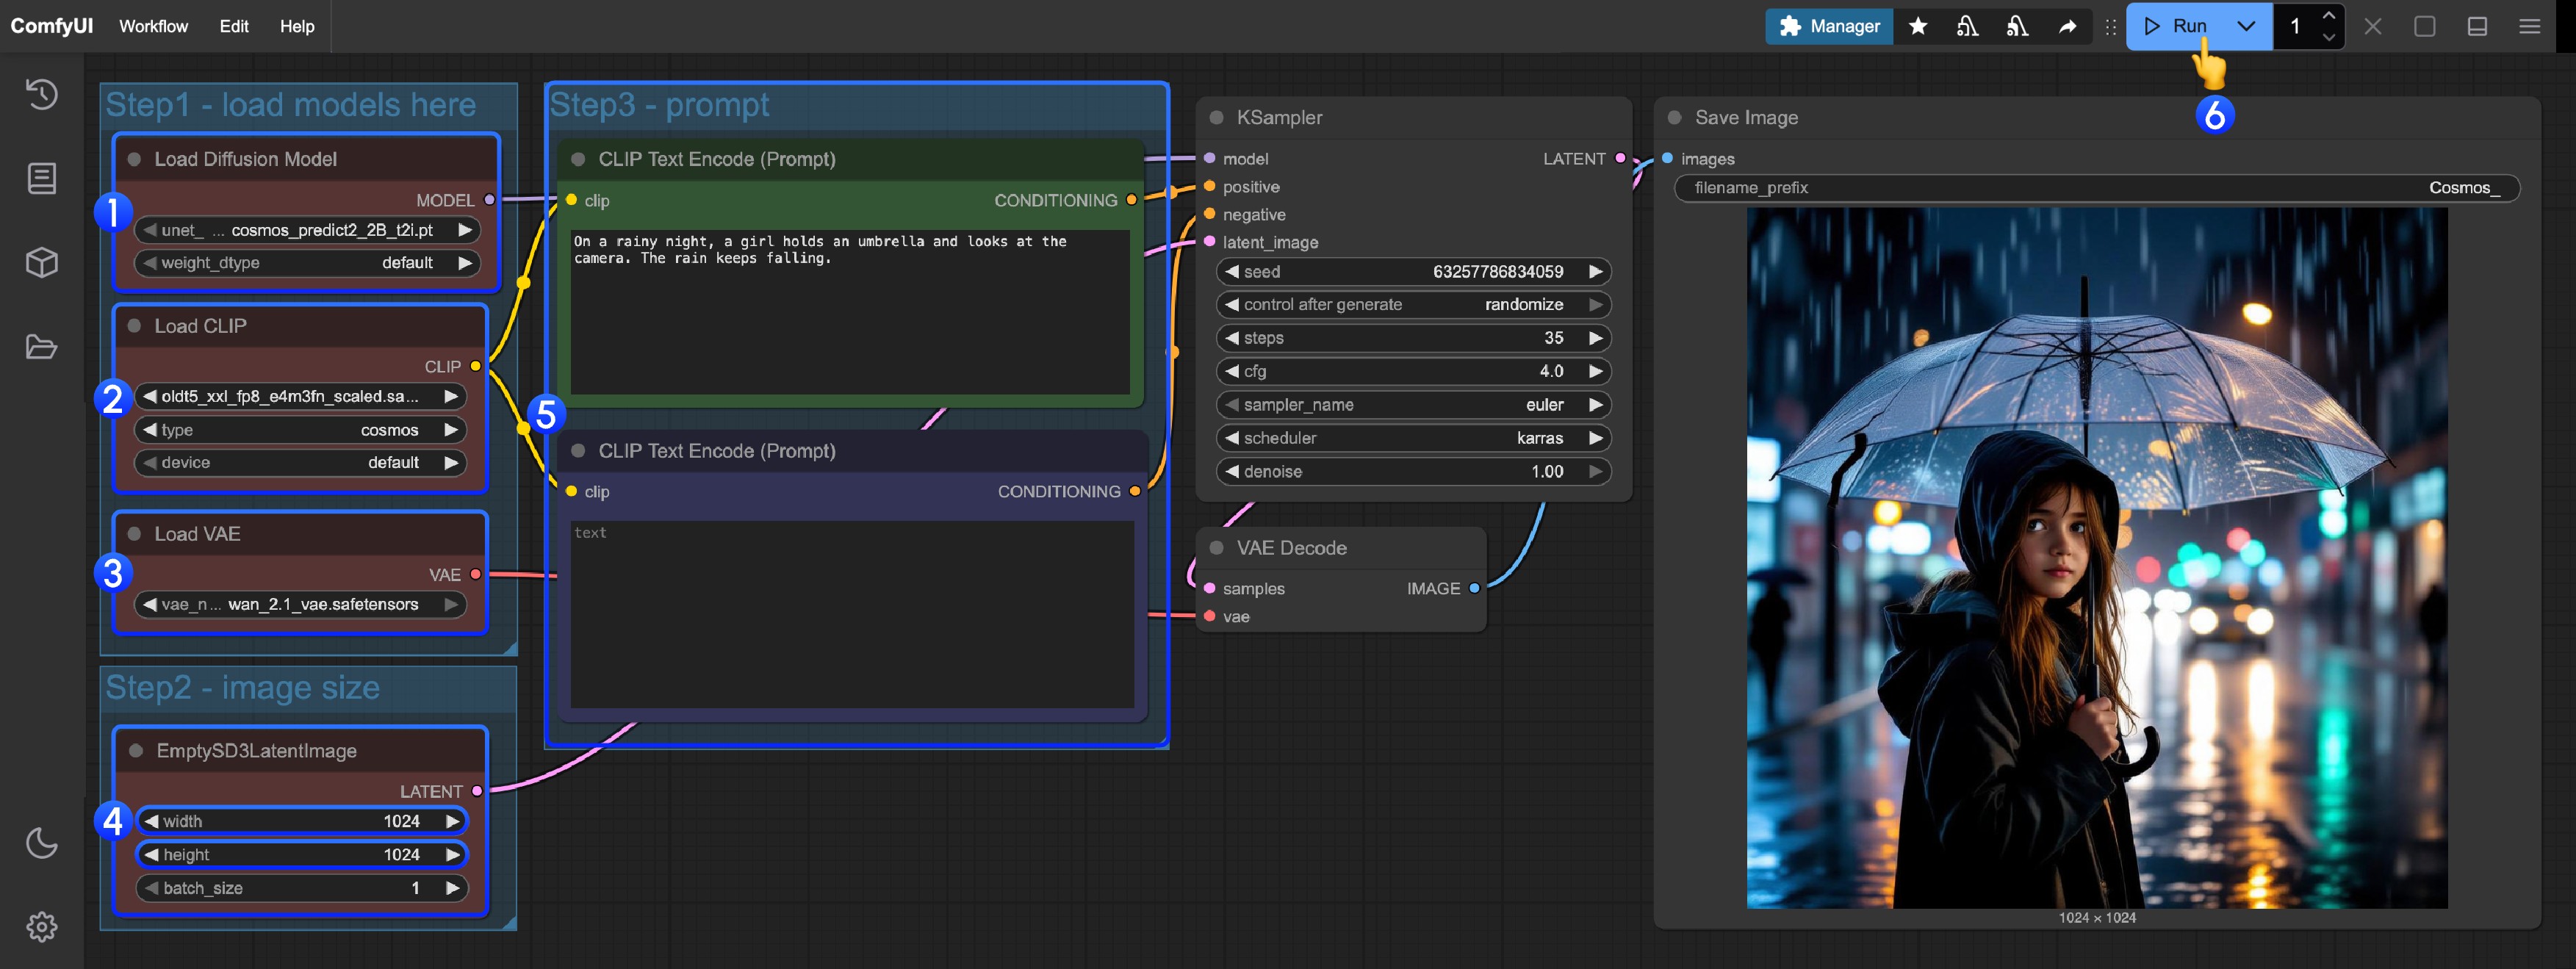
请参照图片序号进行逐步确认,来保证对应工作流的顺利运行
1. 确保 `Load Diffusion Model` 节点加载了 `cosmos_predict2_2B_t2i.safetensors`
2. 确保 `Load CLIP` 节点加载了 `oldt5_xxl_fp8_e4m3fn_scaled.safetensors`
3. 确保 `Load VAE` 节点加载了 `wan_2.1_vae.safetensors`
4. 在 `EmptySD3LatentImage` 设置图片的尺寸
5. 在 `ClipTextEncode` 节点中修改提示词
6. 点击 `Run` 按钮,或者使用快捷键 `Ctrl(cmd) + Enter(回车)` 来执行文生图
7. 生成完成后对应的图片会自动保存到 `ComfyUI/output/` 目录下,你也可以在 `save image` 节点中预览或者调整保存位置